Sunday, June 9, 2013

West Side Story

Well for you dedicated "Building Our Little House" blog readers, I apologize for the long delay in posts.  Life gets busy and let me tell you, you would have gotten bored with our slow progress anyway -- there is soooo much siding and it's hard to think of interesting ways to blog about it. 

Anyway, our whole North side is completely sided, as you can tell... Looks nice, huh?
Today begins our West Side Story -- the siding of the last side -- the west side!  Then we can completely move to getting the inside drywalled and insulated before next winter.  We were so proud of ourselves to make it alive through the winter here with our drafty, half-sided, non-insulated house!  It will be a badge of honor we will wear with pride and I'm sure almost might get us adopted in as natives!

Well, that pretty much gets you up-to-date with our building.  We have done some work with drywall on the inside but not enough to post about.  I'll pick up on that later.

I'm sure most of you readers have heard about the new adventure I'm heading into (if not, give me a call).  I just want to tell you about the fantastic hospital that is taking care of me -- everyone has been so caring and friendly.  Anyway, yesterday I was getting my hair cut and the lady getting hers done next to me overheard me and she told me she worked there (she also thought she was in the outpatient surgery on my biopsy).  Anyway, she shared this music video that the hospital had made on breast cancer awareness and it is totally cute.  My doctor is in it and he really has the moves!  I haven't seen that side of him yet -- when he got my diagnosis back he was so happy he told me he did jumping jacks in the office -- I thought that was as excited as he got.  Well, I'm wrong.  Check out his moves in the great music video (he's the one with the lights on his hat and in his hand).  


Wednesday, June 6, 2012

It's Finished!!! Well, The South Side Anyways...


The South side is completely sided and all the windows are installed.  Doesn't it look nice?  Lots of white, huh?  Yes, our color scheme is white with a white roof.  We do have some color-- you can't really tell in the picture, but the window in the center has barn-red trim on the window.  It is white trim around the window, but he metal on the window is red.  Like I said, you can't really see it in the picture.  The middle and right windows are casement, but the window on the left is a fixed window.  It will be near our stairs, so we thought it shouldn't open.

You can see a little bit of my garden in the foreground.  It's growing really well.  I have onions, radishes, lettuces, bok choi, chard, green beans, and lima beans planted so far.  Here's a closer picture.

Aren't my markers cute?  They are tin can lids that have been punched with the kind of veggie on it.  These are my onions and radishes.  I've also started making the borders on my beds-- it is made out of soda bottles that are filled with dirt and turned upside down and stuck in the ground.  I will eventually have borders around all my beds.  I think they will be really cute!

Tuesday, March 20, 2012

Bouncing Off The Windows


Bouncing Off the Windows
<><><>
I'm bouncing off the windows.
I'm bouncing off the walls.
I'm feeling like my feet are made
of bouncing rubber balls.

I'm running like I'm crazy.
I'm running like I'm mad.
I might seem like a lunatic
but, boy, I'm feeling glad.

I'm jumping like a kangaroo
or like a jumping bean.
I act this way at least a week, right after installing our first south facing window.

--Kenn Nesbitt (with help from Prairie Mama)
Yes, we have our first south facing window installed!!  Doesn't it look nice?  It's a real BIG one and heavy-- I got to help lift it into place, along with my trusty Contractor.  It is a casement window  with the left and right sections that open and the center section is fixed.  If you look up at the top of the picture you'll also notice we have our last chimney in too.  That's the chimney for our living room wood stove.  We now have all three of our chimney's installed.


In the foreground, check out BIG pile of sand.  I, all by myself, shoveled it into the garden cart, moved it and dumped it into that pile.  (Mental note--moving sand is a great workout!)  The reason I had to move it was because the sand was right where my garden was going to be located.  I ordered my seeds a couple weeks ago and I received them the other day. I'm getting excited about planting them, but it's probably still a little early for zone 4.  Here's a couple of shots of the seeds I ordered from Fedco Seeds and Bountiful Gardens


Nice shot with our mansion in the background.  We call it the mansion (1400 sq. ft.) because it is so much larger than our cabin (192 sq. ft.).  They are on one of the big rocks on our property.  I believe it is sandstone.


Here's a close up.  I think I ordered enough!?  Don't you??


Since we're on the subject of windows, I thought I'd show you this one from our Cabin.  This is the service banner I made in honor of our son who is enlisted in the U.S. Marines.  It is a mini quilt with a star appliqued on.  If you don't know what a service banner is, it was invented in 1917 by World War I Army Captain Robert L. Queissner who had two sons serving on the front lines.  It quickly became the unofficial symbol of a child in the service.  If you would like to learn more, click here. Our son has recently been deployed, so please keep him in your prayers.  And in honor of our son, I will put one of his famous quotes from his childhood, for all the Internet to see.  He used it during a moment of madness.  I'm not sure what he meant, but it makes me laugh-- then and now! :o)


Saturday, January 21, 2012

It's A Wrap!


The roof is done, complete, finished!!  Isn't it Beautiful?!!  So now we can finally say we have a roof over our heads, but it's still a bit breezy inside because we don't have all the windows in yet-- there's always something else to work on.  Speaking of other work...here's what else we've been working on...


If you look close on the roof, you will see the start of the growth of a baby chimney.  When full-grown, this will be the chimney for our kitchen stove.


A Jotul (pronounced Yo-tul) #404, cast-iron, wood burning kitchen stove made in Norway, with oven and range-top.  This baby can cook a roast AND all the fixings.  It was manufactured and imported around the 1980s and they are pretty hard to find on the used market, but we found one a while back in Michigan.  We made a mad dash there in a weekend and brought her back to live in our new house.  She's going to love it here!  Can't wait to hook her up and try her out!!

As we go to "press" (my grandkids won't get the significance of that?  Will we have presses in the future??  Or will we just post?  I'll have to go back and watch the Jetson's again.) the second chimney is full grown.  We now have a dual-exhaust house!  We're working on the third one, which I'll post about next time.  Until then...Happy Building!

Monday, December 12, 2011

Half Way


We finally have half of the metal on our south roof.  Sure looks nice!!  My contractor and a friend got two panels (24' long) up on Saturday and they put another four up today.  They are really moving right along.  They told me they thought they would be expert metal roof installers when they get finished.  Oh, that's good.  Guess they were just learning on my roof?!

Friday, November 25, 2011

Happy Thanksgiving!

I know you're thinking that yesterday was Thanksgiving, and you're right, but we were busy working on our house all day yesterday, so we decided to celebrate today (Good choice since the wind decided to blow all day today).  On Thursday we finished getting our south roof completely sheathed and tar papered.  It really looks nice and now we are finally ready to install our metal roofing on the south side.  Here's what it looks like now.  See, completely closed all the way to the top.


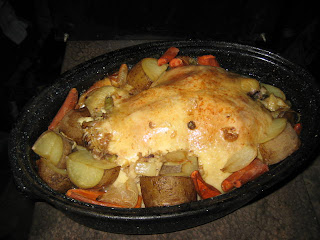
You think that looks good, just wait until you see the next picture!  To celebrate Thanksgiving I made a home-cooked feast that was absolutely the best Thanksgiving Dinner I have ever prepared .  Since my tin oven is rather small, I opted for a whole chicken instead of a turkey.  I found a small blue-speckled roasting pan that fit in my tin oven perfectly.  I stuffed the bird with delicious stuffing and surrounded it with potatoes, carrots and onions.  My tin oven gets placed on top of our wood burning stove and then the blue-speckled roasting pan is placed in the tin oven and four hours later-- wal-la -- the best Thanksgiving dinner ever!!  (WARNING!!  Only view image below on a full stomach or you'll get REALLY hungry.  Our cabin smelled so wonderful, too!  Maybe technology will be available someday to put scents with your pictures??!!)


Here we are after our feast breaking the wish bone.  Guess what I wished for??

Sunday, November 6, 2011

Jam Session


We haven't done any work on our house this week because my contractor caught the flu. So, today I got to do something I enjoy (besides working on the house)--make some apple butter.  I have recently learned how to can and I really enjoy making delicious jams & jellies. So far I have made grape jam, chokecherry jelly, raspberry jam, and now apple butter.  The really awesome thing about all my jams and jellies I have made is that the fruit has been grown by local gardeners and not purchased from a store.

Anyway, I thought today would be the perfect day to can because there was snow predicted and I figured I wouldn't overheat the cabin.  Wrong!  It never snowed and I had to open all the windows.  My sick contractor kept complaining it was too hot!!  I think it only got up to 80.  :o)

The recipe was very simple and easy to make.  I found it at Heidi Swanson's blog called "101 Cookbooks". The only things I did differently was I used some cloves that a friend from work grew, dried and gave to me (same friend who taught me how to can-- "Thanks friend!"), then I ground them myself--which was REALLY hard.  Probably because I don't have a mortar & pestle.  And I've seen "Julie & Julia" tons of times--Julia Childs cooking instructor at the Cordon Bleu says, "You must have a mortar & pestle!".  I guess I just didn't listen!!  Here's my pretend mortar, pestle, and ground cloves.

(By the way, I had store bought ground cloves in my pantry, but wanted to use the home-grown cloves.)  The other thing I did differently than the recipe is I didn't blend the apples.  I just cooked them and smashed them a bit.  I left some chunks--very yummy that way!

Since this is my blog, let me take just a minute to go off-subject.  Has anyone besides me noticed how much food is coming from other countries?   In purchasing apple juice for this recipe I had a hard time finding juice from the USA.  I finally found Tree Top, which said it was 100% USA apples.


If you are looking for juice from the USA, be sure to check on the plastic bottle too.  Some of the brands didn't say where the juice was from on the label, but had printed on the plastic bottle where it was from.


Anyway, after heating up our cabin to over 80 degrees, I ended up with lovely apple butter we'll enjoy all winter long.


I used our Jotul woodstove to cook the apple butter


and our Coleman cookstove to process the jars


This stove was given to us by my Mom & Dad.  It originally belonged to my Grandma & Grandpa.  I bet they never thought their granddaughter would be canning apple butter with it in 2011, in a cabin!